Sunday, 18 November 2012

Dry-Erase Collage Frame Calendar

This is a cute and useful project I came across not to far into my pinterest addiction. This collage frame calendar is a cute way to keep your week organized while adhering to your decor as well as a good way to use up extra paper scraps or any leftover scrapbooking notions from previous projects.

The original source for the project can be found here: http://i.imgur.com/kudpx.jpg

I happened to have a collage frame laying around (I'm sure its 'intended' purpose was to display some of my Thailand photos, as I received it as a gift when I returned home to Canada in the spring); but I felt that this would be a good use for it as well.

To start, cut out scrapbook paper for each photo slot. I laid my papers out first to make sure I was happy with how the colors worked together.


Next I used some letter stamps from my scrapbook box to stamp a day of the week on each paper. I also used embossing powder over the letters so the color would appear darker and glossy once framed.


I took some  stickers, cut outs and stamps I had left over from a previous scrapbook project to jazz things up a little. With the extra cell left over (my collage frame had room for 8 photos) I used some cork board remnant and foam core to create a mini cork board to keep important things at hand.


This is an easy project that can add a pop of lively color to any room in your house! I also appreciate that you can keep things as simple or as detailed as you want depending on the time, space and number of supplies you have to dedicate to your project.


Happy Scrapbooking!

Sarah

Wednesday, 14 November 2012

Baked Apples in a Bag

First of all, all I have to say is Thank you, Thank you, THANK YOU Pinterest! This lovely recipe is a GEM.
For those of you that know me well, know I have a deep love for pie and pie filling. So when I stumbled upon this recipe for baked apples I really wanted to try it. Today seemed like a perfect day, cold, rainy and quiet so I went for it.
If you want to try it on your own, you can find the recipe at the original source here: http://www.salad-in-a-jar.com/family-recipes/apples-in-a-bag

To Start: Gather and measure out all your ingredients. I had a large apple, so I doubled the sugar, cinnamon and water. I also did not have any cornstarch on hand, so I added brown sugar and it turned out fine. The more sugar, the better!


Chop your apple into slices and add all the ingredients into a freezer bag. Zip the freezer bag closed and mix everything together.


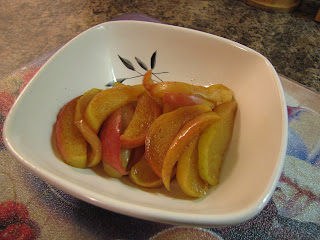
Place the bag (partially open to vent) in the microwave for 2 - 2 1/2 minutes. Be careful when pulling the bag out of the microwave... it will be HOT. Scoop out the apples into a bowl and serve. The flavor is unreal, and the aroma left behind is lovely. I had a fair amount of sauce left in the bottom of the bag. I didn't pour it over my apples for calories sake, but over vanilla bean ice cream I can only image how good it will taste.


Do I recommend trying 'Baked Apples in a Bag'? Heck yes! This recipe is soon to become one of my regular winter snack staples. mmmmmmmmmm.

Sarah


Wednesday, 7 November 2012

Easy Body Butter

After having the concept for this blog in the back of my head for months, I'm happy to have finally found time to write my first post! For my first 'Pinterest Project' I decided to try to make my own homemade body butter.

The original source for this project can be found here: http://www.rawmazing.com/homemade-body-butter-recipe/
Upon first seeing the idea on pinterest, it almost sounded too easy. In the past, I have spent lots of money on expensive body butters, not really thinking about what ingredients were in them and whether or not they were truly beneficial for my skin. The recipe for this body butter consisted of only 4 ingredients:


  • 1 cup (8oz) of raw unrefined shea 
  • 1/2 cup (4oz) of raw coconut oil (solid form)
  • 1/2 cup (4oz) of a carrier oil (I used almond, but feel free to use any oil to suit your tastes!)
  •  essential oils to scent

  • Following the directions carefully, I added my ingredients to a double boiler and let them melt until they were liquefied  adding in the carrier oil and essential oils while they were cooling.


    In a double boiler on medium heat, melt the shea and coconut oil together.


    I left the pot in the freezer for about 20 minutes to let the mixture partially re solidify, then proceeded to whip up the butter using a hand mixer until it was thick.

    While cooling, add in the carrier oil and any essential oils. Allow oils to partially solidify before mixing.

    Whip the mixture together, and place in a clean, glass container.

    I divided the mixture evenly into two glass jars I picked up at the grocery store for about 3.00 a piece. I decorated the jars using thin hemp, beads and a gift tag with the recipe included (who wouldn't want a gift you can make yourself AND share with others!).

    Hemp and beads add nice, natural decoration to the jars.

    Including a recipe card allows your gift to be shared with others!

    Overall, I think they turned out really well. I was surprised it worked out exactly as described and how little time the entire process took. The only downside to this project is that some of the ingredients may be difficult to find depending where you live, (ebay to the rescue!) such as the raw shea. Definitely a pin worth trying!

    Sarah